Building Todo API Serverless application using python
- Chapi Menge
- Cloud
- December 2, 2022
If you are starting out with serverless and want to build a serverless application using python, then this blog post is for you.
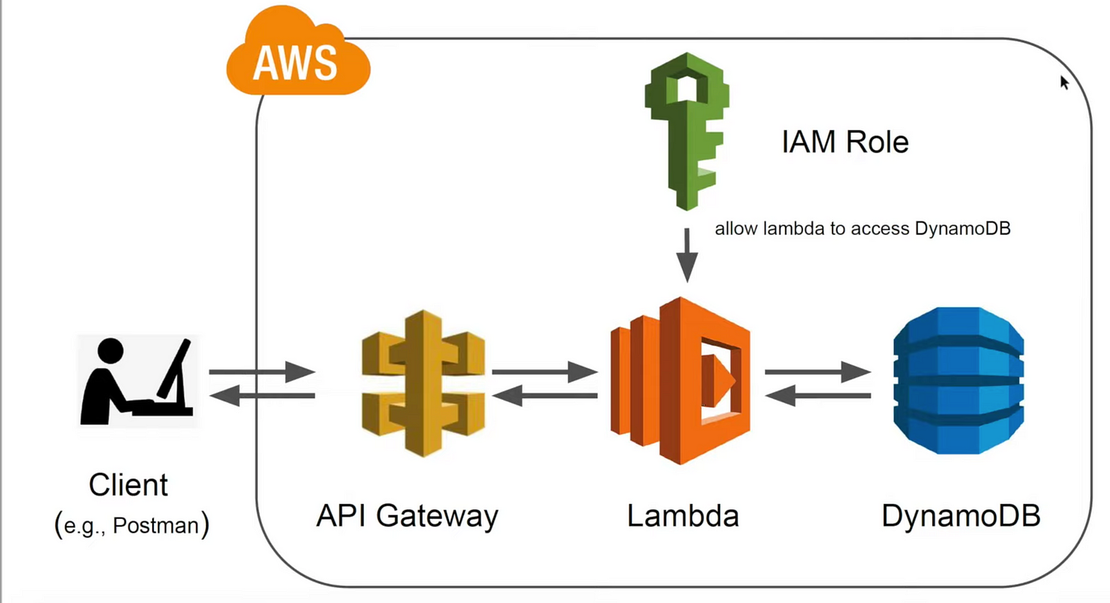
As we discussed in my previous post about Introduction to Serverless , today we are going to build a very simple Todo application using Python, Serverless framework and AWS Lambda.
Today’s content is focused on development and deployment of the application. So the topic we are going to cover is:
- Pre-requisites
- Create a Serverless project
- Create dynamodb table
- Create Lambda functions
- Deploy the application
without further ado, let’s get started. Ready to get your hands dirty?
Open Your pc, Open your code editor and wear your superhero suit to start the journey of building a serverless application with me.
Pre-requisites
- Python installed on your machine and know basic of python.
- AWS account and AWS CLI installed on your machine.
- Serverless framework installed on your machine.
- Git Installed and [Github] account for version controlling and remote repository. (Optional)
I know most of your didn’t have AWS account. Our current situation in Ethiopia it is not easy to get an AWS account. For that reason, I am going to connect my Master card to your aws account to use the AWS Free tier account. The catch is i have some question the first few people who answer correctly will get the aws account.
For the Contest please refer to this here
Pre-requisites in Activity
Creating AWS IAM
I am not going to teach you how to use your aws account in this blog but please follow the best practice and create IAM account even for your usage. Please see this Blog by AWS
So now we are going to create AWS IAM user for our deployment later usage. Here are the step your should follow:
Go to IAM by searching in aws search panel

Click Users in the left navigation bar and Click Add Users
Give a name of your choice in User name field and select Access key - Programmatic access under the Select AWS access type
After you click next, it let’s you choose permission for the user. For now we are going to give Full Admin Access Yet in your real world application you have to make sure you give the right amount of permission for your user. Select Create Group
Give the name of your choice and select AdministratorAccess under Policy name and click Create
After you created the Group select the group for the our new user. After that click Next and skip the tag creation for now and Click Review. After all this Review everything you set like the name and other stuff anc click Create User
Make sure not to close the window before you grab the access key and Secret key. Put them in a safe place we are going to use them in a bit.
That is all for creating user. I promise you it is a very easy process to create this if you are scared because we have 7 step. I wanna make sure to led you at every step.
The next thing we are going to do is setting up our Serverless framework. It is also a very easy process.
- Install NodeJs(LTS is better) for the serverless framework is build by NodeJs.
- Install the serverless framework by using the below code
npm install -g serverless
- configure AWS. Just paste your AWS Access key and secret key below
serverless config credentials --provider aws --key YOUR_ACCESS_KEY --secret YOUR_SECRET_KEY
OR
sls config credentials --provider aws --key YOUR_ACCESS_KEY --secret YOUR_SECRET_KEY
Serverless can be access in your command line by typing serverless or sls
- There wont be 4th step 😜
Create a Serverless project
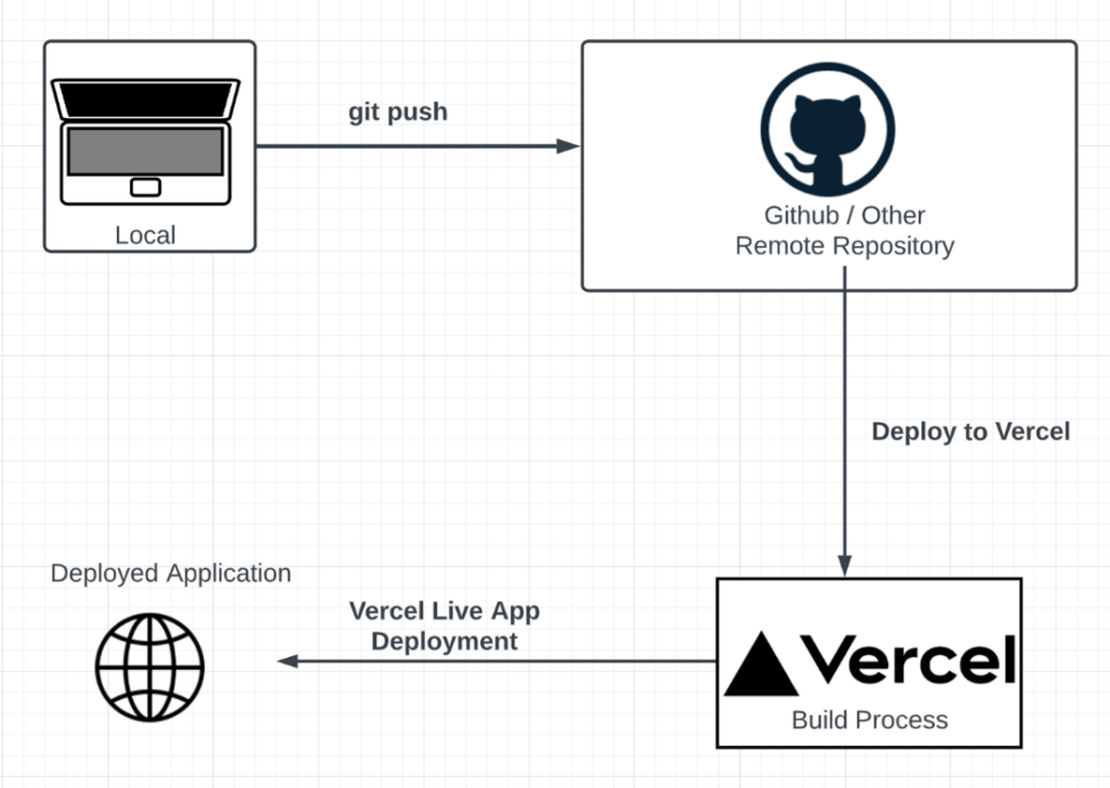
If you are going to use Git and Github. Go create new repo and and clone it in your local machine. After that go to that directory and open terminal.
Now Open terminal and go to the directory you wanna work with. I suggest you have folder like project -> Serverless
Now let’s initialize our project.
serverless
Enter and choose AWS - Python - HTTP API
Name for the project Todo or anything you want but make sure to change it for the rest of the blog.
Let’s open our code editor and start looking at the project.
You will find a new folder in the current directory which is name same as the project name you given in the above process while creating project.
todo
│   .gitignore
│   handler.py
│   README.md
|   serverless.yml
No go to your serverless.yml and paste the below code. I have put comment on it.
service: Todo
frameworkVersion: "3"

provider:
  name: aws
  runtime: python3.8

  # Totally optional, but it's a good idea to set this
  stage: dev
  profile: default # if you are working with different AWS account
  stackName: todo-stack
  logRetentionInDays: 14
  region: "us-east-1" # if you are working with different AWS region choose nearest to you

functions:
  hello:
    handler: handler.hello
    events:
      - httpApi:
          path: /
          method: get
You can skip the part that says Optional but I recommend to do it.
Now we are done with setting up the project. Let’s move to DynamoDB stuff.
Create dynamodb table
DynamoDB is aws fully managed NoSQL database. It is very simple and easy to use, Yet powerful to scale your database without worrying about sharding or any advanced stuff in database. If you want to read more please here .
Now let’s edit our DynamoDB in our serverless.yml file and paste the below code.
Notice: #new comment to indicate the added line of code.
service: Todo
frameworkVersion: "3"

# new
custom:
  tableName: "todo-table-${self:provider.stage}"

provider:
  name: aws
  runtime: python3.8

  # Totally optional, but it's a good idea to set this
  stage: dev
  profile: default # if you are working with different AWS account
  stackName: todo-stack
  logRetentionInDays: 14
  region: "us-east-1" # if you are working with different AWS region choose nearest to you

  # new
  iam:
    role:
      statements:
        - Effect: Allow
          Action:
            - dynamodb:Query
            - dynamodb:Scan
            - dynamodb:GetItem
            - dynamodb:PutItem
            - dynamodb:UpdateItem
            - dynamodb:DeleteItem
          Resource:
            - Fn::GetAtt: [TodoTable, Arn]
  environment:
    TODO_TABLE: ${self:custom.tableName}

functions:
  hello:
    handler: handler.hello
    events:
      - httpApi:
          path: /
          method: get

# new
resources:
  Resources:
    TodoTable:
      Type: AWS::DynamoDB::Table
      Properties:
        AttributeDefinitions:
          - AttributeName: todoId
            AttributeType: S
        KeySchema:
          - AttributeName: todoId
            KeyType: HASH
        ProvisionedThroughput:
          ReadCapacityUnits: 1
          WriteCapacityUnits: 1
        TableName: ${self:custom.tableName}
Here what is happening is we are defining our Database Schema to be created when we deployed.
You might ask me so will it be create whenever we deployed ? The answer is No. Serverless will check the dynamo table using the name so if the name exists it won’t create it. Instead it will grab it’s ARN and use it to point to the DB. Another question pop up right?
What is ARN ? we wont keep up with these question because you might be educated about the cloud by the LEGENDARY ME 😝(like i know ntg). So ARN is Amazon Resource Names. Easy right. it is identifier of the resource. Like your name or your phone number identifies you.
We only define todoId in our dynamo if you notice it because we know have to give dynamodb the key or as we knew before same like primary key.
Do you know in SQL primary key will be indexed by default which makes it very fast if you search by it’s primary key
Moving on we are done with the definition of our DynamoDB if you have any question pops it the comment section below.
Create Lambda functions
So my plan is we are going to have 4 lambda functions:
- Create Function
- List Function
- Update Function
- Delete Function
Let’s start with the Create Function. So our create function will do the below thing.
- get the POST request body
- extract the
todoparameter from the body which is the only thing we need to create. - check if the name exists in our database if exist raise error
- create the todo and return success or error message
Now open handler.py and paste the code below. I have describe the code using comment. If you don’t understand it ask me in the comment section.
import os
import boto3
import json

TODO_TABLE = os.getenv('TODO_TABLE')

dynamodb = boto3.resource('dynamodb')
table = dynamodb.Table(TODO_TABLE)

def create_todo(event, context):
    '''
    Create Todo Application in Dynamo DB

    Params:
        event: API Gateway Event
        context: Lambda Context

    Return:
        response: API Gateway Response

    response.body: JSON String
        message: String
        todoId: String
        error: Boolean|String
    '''
    try:
        body = event['body']

        # check if the body is empty
        if body is None:
            raise Exception('Body is empty')

        # check if the body is a string and convert it to a dict
        if isinstance(body, str):
            body = json.loads(body)

        todo = body['todo']

        # check if the todo is empty
        if todo is None:
            raise Exception('Todo is empty')

        # check if todo is already in the table
        if table.get_item(Key={'todo': todo}).get('Item') is not None:
            raise Exception('Todo already exists')

        # create todo
        item = table.put_item(Item={'todo': todo, 'done': False})

        # return todoId
        response = {
            'statusCode': 200,
            'body': json.dumps({
                'message': 'Todo created',
                'todoId': item['todo'],
                'error': False
            })
        }

        return response

    except Exception as e:
        # return error
        response = {
            'statusCode': 400,
            'body': json.dumps({
                'message': str(e),
                'error': True
            })
        }

        return response
Now we can continue to the next function which is List Function
So the Steps will be
- Get the POST request (am not going to consider customized pagination other than dynamodb default one)
- Get all the list of the todo
- Return the list
Open up the handler.py and append the below code. The code is documented and it is clear.
'''
this goes to Below the create_todo function
'''

def list_todo(event, context):
    '''
    List Todo Application in Dynamo DB

    Params:
        event: API Gateway Event
        context: Lambda Context

    Return:
        response: API Gateway Response

    response.body: JSON String
        message: String
        todos: List | None
        error: Boolean|String
    '''
    try:
        # list all todo
        response = table.scan()
        todos = response['Items']

        # return todos
        response = {
            'statusCode': 200,
            'body': json.dumps({
                'todos': todos,
                'error': False
            })
        }

        return response

    except Exception as e:
        # return error
        response = {
            'statusCode': 400,
            'body': json.dumps({
                'message': str(e),
                'error': True
            })
        }

        return response
The next function will be the Update function. One thing in the update is to make things easy in the update method we only update the done field which indicated if the todo is completed or not. So we only allow to be completed the todo.
Open up the handler.py and append the code below too. The code is documented and it is clear
'''
this method goes to below the list_todo function
'''

def update(event, context):
    '''
    Update Todo Application in Dynamo DB

    Params:
        event: API Gateway Event
        context: Lambda Context

    Return:
        response: API Gateway Response

    response.body: JSON String
        message: String
        error: Boolean|String
    '''
    try:
        body = event['body']

        # check if the body is empty
        if body is None:
            raise Exception('Body is empty')

        # check if the body is a string and convert it to a dict
        if isinstance(body, str):
            body = json.loads(body)

        todo = body['todo']

        # check if the todo is empty
        if todo is None:
            raise Exception('Todo is empty')

        # check if todo is already in the table
        if table.get_item(Key={'todo': todo}).get('Item') is None:
            raise Exception('Todo does not exist')

        # update todo
        table.update_item(
            Key={'todo': todo},
            UpdateExpression='SET done = :done',
            ExpressionAttributeValues={
                ':done': True
            }
        )

        # return todoId
        response = {
            'statusCode': 200,
            'body': json.dumps({
                'message': 'Todo updated',
                'error': False
            })
        }

        return response

    except Exception as e:
        # return error
        response = {
            'statusCode': 400,
            'body': json.dumps({
                'message': str(e),
                'error': True
            })
        }

        return response
Now our last function will be 🥁🥁🥁 the DELETE function. hang on buddy we are almost finished with the code.
Open up the handler.py and append the code below too. The code is documented and it is clear
'''
this method goes to below the update_todo function
'''

def delete_todo(event, context):
    '''
    Delete Todo Application in Dynamo DB

    Params:
        event: API Gateway Event
        context: Lambda Context

    Return:
        response: API Gateway Response

    response.body: JSON String
        message: String
        error: Boolean|String
    '''
    try:
        body = event['body']

        # check if the body is empty
        if body is None:
            raise Exception('Body is empty')

        # check if the body is a string and convert it to a dict
        if isinstance(body, str):
            body = json.loads(body)

        todo = body['todo']

        # check if the todo is empty
        if todo is None:
            raise Exception('Todo is empty')

        # check if todo is already in the table
        if table.get_item(Key={'todo': todo}).get('Item') is None:
            raise Exception('Todo does not exist')

        # delete todo
        table.delete_item(Key={'todo': todo})

        # return todoId
        response = {
            'statusCode': 200,
            'body': json.dumps({
                'message': 'Todo deleted',
                'error': False
            })
        }

        return response

    except Exception as e:
        # return error
        response = {
            'statusCode': 400,
            'body': json.dumps({
                'message': str(e),
                'error': True
            })
        }

        return response
It is done. Our python code is done.
What is the next step ? you guessed it right connecting our python code to lambda function in the serverless.yml file.
Now open up serverless.yml and add the newly added code which is connecting our function to serverless lambda definition.
service: Todo
frameworkVersion: "3"

custom:
  tableName: "todo-table-${self:provider.stage}"

provider:
  name: aws
  runtime: python3.8

  # Totally optional, but it's a good idea to set this
  stage: dev
  profile: default # if you are working with different AWS account
  stackName: todo-stack
  logRetentionInDays: 14
  region: "us-east-1" # if you are working with different AWS region choose nearest to you

  # defining role for our lambda to access dynamodb
  iam:
    role:
      statements:
        - Effect: Allow
          Action:
            - dynamodb:Query
            - dynamodb:Scan
            - dynamodb:GetItem
            - dynamodb:PutItem
            - dynamodb:UpdateItem
            - dynamodb:DeleteItem
          Resource:
            - Fn::GetAtt: [TodoTable, Arn]
  environment:
    TODO_TABLE: ${self:custom.tableName}

functions:
  # new
  createTodo:
    handler: handler.create_todo
    events:
      - httpApi:
          path: /create
          method: post
  listTodos:
    handler: handler.list_todo
    events:
      - httpApi:
          path: /list
          method: get

  updateTodo:
    handler: handler.update_todo
    events:
      - httpApi:
          path: /update
          method: put

  deleteTodo:
    handler: handler.delete_todo
    events:
      - httpApi:
          path: /delete
          method: delete

resources:
  Resources:
    TodoTable:
      Type: AWS::DynamoDB::Table
      Properties:
        AttributeDefinitions:
          - AttributeName: todoId
            AttributeType: S
        KeySchema:
          - AttributeName: todoId
            KeyType: HASH
        ProvisionedThroughput:
          ReadCapacityUnits: 1
          WriteCapacityUnits: 1
        TableName: ${self:custom.tableName}
Now What remains ? I know we didn’t implement the todo-detail endpoint. This blog is just to get your hands dirty on serverless. There are many thing that can be improved but remember this is for the beginners.
Deploy the application
The exciting part of it is deployment. This is making our magical application available to the internet or to the whole world. So what command do we need to deploy ?

This answer might be the most longest command we have in this blog. YEAAH right ? 😜 😂
So make sure you are in a folder where serverless.yml file exists and execute the below command to fire off and deploy everything we have done.
serverless deploy

We have launched successfully

Now you can play with the api as long as you want but in the mean time we have to delete everything as this is for only educational purposes. When you feel like you are done playing with the API delete the stack using the below code.
sls remove
Github Repo for this blog is: https://github.com/chapimenge3/TodoAPI-AWSLambda
Next up the we will build a complex application with a series of blog.
Contest [CLOSED]
Question:
- Explain where the huge performance of python 3.11 comes from and explain it in your word and in detail. Then Post the Answer in Linkedin post by Tagging me. You can find me Temkin Mengistu . Comment below the link of the post.
Rule
- You have use your own wording
- You can refer and do any research as much as you want.
- You have to tag me Temkin Mengistu on your linkedin post.
- You have to comment below the link of the linkedin post.
- Winner will be choosen by their idea and how strong it is.
- The contest will be closed by Dec 20, 2022.
There won’t be only one answer to this kind of question so enjoy.
if you like this blog please share it with your friends and colleagues. It will help me a lot.
Until next time, wish you the best.
Chapi Menge.